

Monitoring CPU voltage is crucial for system stability, especially when overclocking or troubleshooting performance issues. While software tools like CPU-Z and HWMonitor offer convenience, using a multimeter gives you the most accurate reading. This guide will show you how to check CPU voltage with a multimeter safely and precisely.
Step-by-Step Guide to Checking CPU Voltage with a Multimeter
1. Power Off and Unplug Your PC
Ensure your system is powered off and unplugged before handling any hardware. This minimizes the risk of electrical hazards.
2. Locate the CPU Power Pins
Refer to your motherboard’s manual to find the VCore (CPU voltage) and ground (GND) pins on the motherboard.
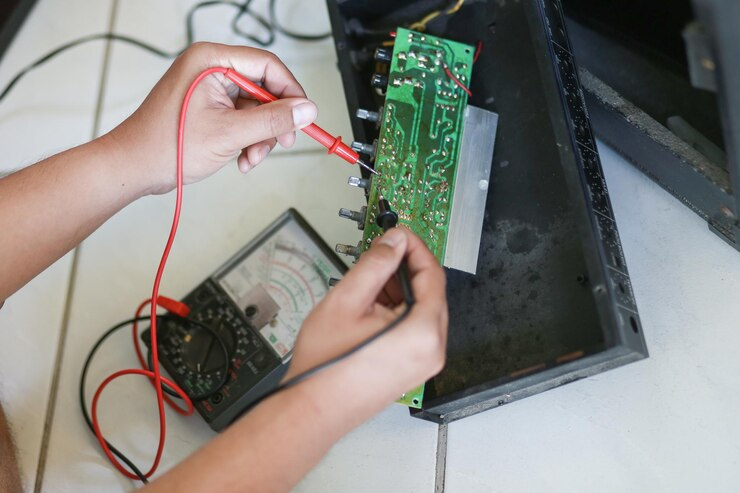
3. Set the Multimeter to DC Voltage Mode
Set your multimeter to measure DC voltage (V). Choose an appropriate voltage range based on your CPU’s standard voltage.
4. Connect the Multimeter Probes
Place the red probe on the VCore pin (CPU voltage input) and the black probe on a ground pin.
5. Power On Your PC and Read the Voltage
Turn on your PC and observe the voltage reading on your multimeter. Keep the probes steady while the system powers up.
Warning: Always be cautious when handling live circuits. If you’re not experienced with PC hardware, seek professional help.

Understanding CPU Voltage Readings
1. Normal CPU Voltage Range
Typically, standard CPU voltage ranges between 0.8V and 1.4V, depending on the load and the specific CPU model.
2. Idle vs. Load Voltage Fluctuations
- Idle State: The voltage decreases when the CPU is idle to conserve power.
- Under Load: When the CPU is under load (e.g., running intensive tasks or games), the voltage increases to meet power demands.
3. Overclocking and CPU Voltage
Overclocking may require higher CPU voltages (up to 1.5V). However, be cautious: excessive voltage can increase heat output and reduce the CPU’s lifespan. If your voltage readings seem unusually high, check your BIOS settings and cooling system.
Why Checking CPU Voltage is Important?
Heat Management: Excess voltage can lead to overheating and may damage your CPU over time.
Overclocking: If you’re overclocking your CPU, it’s vital to monitor voltage to ensure stability and avoid potential damage.
System Stability: If your system is crashing, slow, or experiencing unusual behavior, the CPU voltage could be a contributing factor.
Common Issues with CPU Voltage
Too Low Voltage:
If the voltage is too low (below 0.8V), your CPU may become unstable, leading to crashes, blue screen errors, and poor performance.
Voltage Fluctuations:
If you notice large fluctuations in your CPU voltage (especially under load), this could indicate an issue with your power supply or motherboard. It’s advisable to check your BIOS settings and consider a PSU upgrade if needed.
Too High Voltage:
Voltage higher than 1.4V can cause excess heat, reducing the lifespan of your CPU. If your voltage readings are consistently high, it could be due to overclocking settings or incorrect BIOS configurations.

FAQs About Checking CPU Voltage
1. Is high CPU voltage dangerous?
Yes, excessive voltage generates heat, which can damage your CPU over time. Ensure voltage stays within safe limits.
2. Why does my CPU voltage change?
Modern CPUs use dynamic voltage scaling (e.g., Intel’s SpeedShift, AMD’s Cool’n’Quiet) to adjust the voltage according to the workload.
3. What’s a safe CPU voltage for gaming?
For most CPUs, a voltage of 1.2V to 1.3V under load is considered safe.
4. Can incorrect voltage settings cause system crashes?
Yes, insufficient voltage can cause instability, leading to crashes and blue screen errors (BSOD).
5. Does undervolting improve performance?
Undervolting reduces heat and power consumption without sacrificing performance, offering a cooling efficiency boost for your system.
Final Thoughts: Optimizing CPU Voltage for Stability
Proper CPU voltage management is key to maintaining system stability and longevity. While tools like CPU-Z or HWMonitor provide convenient readings, using a multimeter offers the most accurate results for precise voltage measurements.
For most users, software utilities are sufficient, but for those looking to fine-tune their system, using a multimeter ensures the best accuracy. Keeping your CPU voltage within safe limits helps optimize performance while preventing potential hardware damage.